Friday, June 26, 2015

Garage Pegboard Wall

Warning you now: there are a LOT of photos in this post!

On Monday, I shared some “before” and “progress” photos of turning my cramped one-car garage into an organized workshop. I have a bunch of plans for different sections in this space, but two of the items already crossed off the list are the DIY lumber rack on the right side, and my brand new pegboard storage wall on the left:

But let’s go over some backstory for why I chose a narrow pegboard wall in the first place: I’d love to trick out every inch of floor space with what I want to use this garage for (building, painting, etc.), but this is also not my forever home. So when it comes to home improvements in general, I also want to keep in mind that this home will need to sell to a new owner someday… who might not want to lose the ability to actually house a car in here.

Even though the garage is long enough to have a small nook in the back near the water heater, I have less than 10 feet in total width, which means anything I install on the sides has to either be very narrow or movable (like my DIY work table on wheels). If I were to install anything fixed along the wall that was too wide (like cabinets), I might have to rip it back out again before putting the house up for sale. And while there could be the argument that I should customize the house to my needs, I don’t want to create that kind of work for myself when I know I could be moving out in just a few years.

I’ve been searching for narrow organization plans for a while now, but haven’t had a lot of luck until I stumbled onto this amazingly simple idea from The Creativity Exchange. I tweaked the design plans slightly for my space so that it only required the use of 8-foot boards for the entire wall… and without needing to make a single cut.

What you need:
  • 1 – 4′ x 8′ pre-primed white pegboard
  • 5 – 1″ x 6″ x 8′ pine boards
  • 6 – 1″ x 2″ x 8′ furring strips

Total cost: $62.94!

The entire structure is supported by a series of 1×2 furring strips. For those that aren’t familiar with the term, “furring strips” are simply inexpensive 1×2 boards that are usually sold in a separate area from project boards at the home improvement store (in almost every store I’ve ever been to, it’s the next aisle over and toward the back). Where nicer pine boards of the same dimensions may cost a few dollars apiece, an 8-foot 1×2 furring strip is considerably cheaper (only 98 cents). I usually have to look through the entire pile just to find boards that are straight enough for my project, but the savings is totally worth the effort. And in the end, you can’t even see them in the finished look.

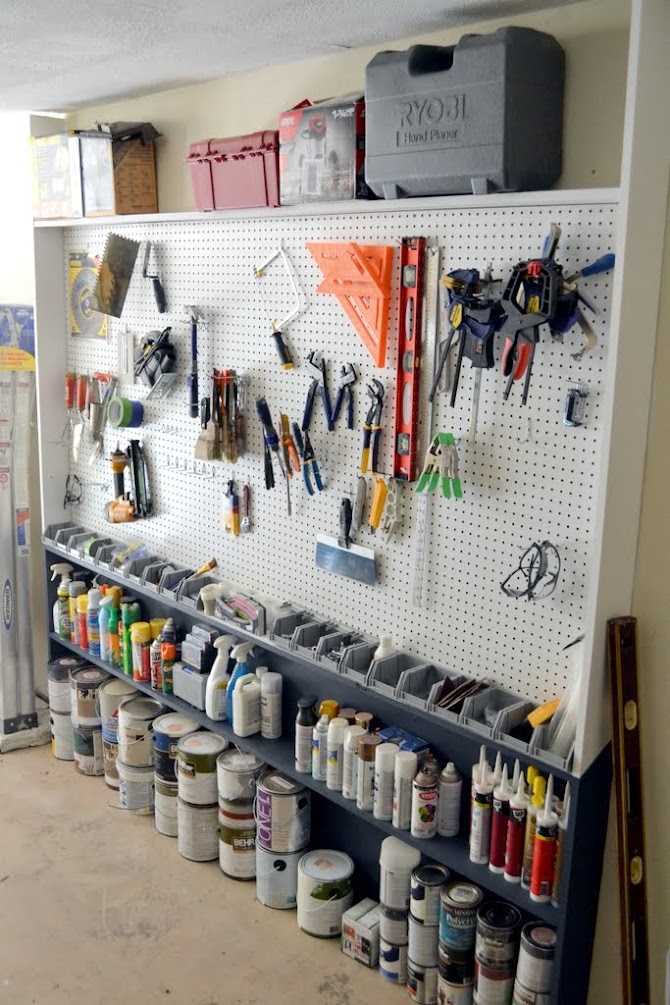
In these plans, there are two usable shelves that support various building supplies (like spray bottles, spray cans, and caulk tubes) and paint cans underneath, and one additional shelf up top for tools and hardware cases I use less often.

To determine spacing, I simply measured the height of the tallest items and made sure they fit (so two gallons or three quarts of paint high on the floor, then caulk tube height for the shelf).

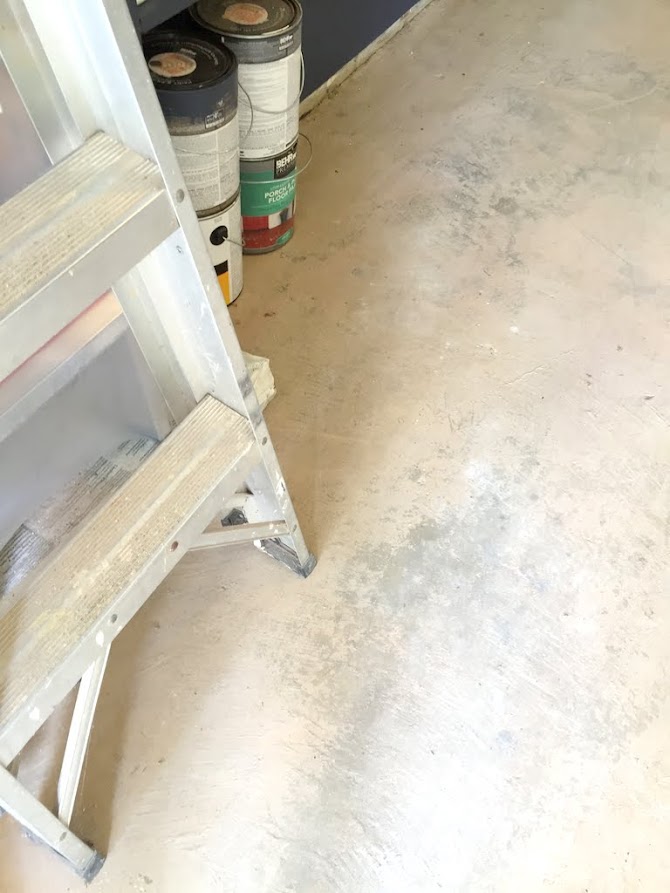
In truth, I actually got started on this project a couple of weeks ago when the garage still looked like this (which, thankfully, is not at all the case anymore!):

After the furring strips were screwed into studs, I then added 1×6 boards on top so that the furring strips supported the weight. The sides are also 1×6 boards screwed and nailed into place as well (screw them into the horizontal 1×6’s and they’ll stay perfectly secure). Cyndy did a great job in her tutorial for explaining how she created the original plans, so you’ll need to check those out first and then read the modifications I made below:

  1. Install the first furring strip that will support the first shelf under the pegboard (screw into studs). In my garage, this came out to around 30 inches from the floor (there was another reason for this height as well, but I’ll reveal that at a future date when the project is finished).
  2. Install a 1×6 board on top of the furring strip.
  3. Install two 1×6 boards vertically on both sides with screws (like an H). Check for level, but do not secure the top… this will allow for adjustment when you add the top shelf and pegboard.
  4. Install furring strips in a 4′ by 8′ rectangular grid with two strips evenly spaced toward the middle (see pic above) to support the pegboard. Try to screw into studs whenever possible (your tool-laden wall would probably qualify for America’s Funniest Home Videos if it all fell right out of the drywall… and slice off a toe).
  5. Install another furring strip toward the bottom, about 12 inches down from the first one you put on the wall (about the height of a caulk tube + a couple inches of space). This will create the support for the lower shelf.
  6. Add a 1×6 on the top for the top shelf, and a 1×6 to the bottom furring strip support for the lower shelf.
  7. Screw the pegboard into the furring strip 4×8 grid (screwing through the holes makes them virtually disappear).
  8. Secure the sides with screws and a nail gun.

Done!

Prime, then paint. I used leftover paint from the office (a custom white paint match and Hale Navy by Benjamin Moore). For fun, I taped off the division between the two colors at an angle on each side. I thought it looked a little nicer than a straight line between the top and bottom.

And then, the fun part: loading ‘er up with all of the tools I’ve misplaced and found again during the garage cleanup project. Cans of paint sit on the floor, but everything else goes on a shelf or on the pegboard with hooks.

Unlike the inspiration pegboard wall, I kept the top shelf without a lip so that I could stack various tool cases and boxes out of the way. Since the height of this shelf is above the usual height of a car, there’s really no interference if I were to try to still park a car in here.

As for the other organizational items, I recently found these gray bins as part of a stackable container at Harbor Freight ($9.99), but broke them up for additional storage along the shelf along the pegboard.

The bins have a small lip along the back that hooks into a plastic rail mount, so once the rail was screwed in, the bins easily hook into place and don’t slide around.

It isn’t as organized as I’d like to have it eventually (which is also why the bins are currently label-less), but it was great to have while I cleaned up the garage and could put miscellaneous screws, bits, nails, spacers, and other tiny items in an accessible spot.

I’ve been figuring out placement as I go, but one idea I wanted to share are my eye protection hooks: I’ve placed one at either end of the wall, both because I have a lot of eyewear (I have picked up at least 2 free ones each year from going to the Haven conference) and because this way, I can easily reach a pair whether I’m heading out the garage door or heading back into the house. It’s come in handy a lot already!

The pegboard shelves also helped me to quickly convert the back nook to a useful space for gardening supplies and spray paint — snowball-effect organization at its finest.

I haven’t yet installed anything on the sides, but I plan to add some larger hooks later to hang other items like extension cords and my grandfather’s old wooden level (you can spy it in a few of these photos).

Now, I have even less to trip over in the UDH workshop, can find what I need with ease, and have a place to put things when I’m done. There are still more projects yet to be finished in the garage, but thanks to these last few weeks of effort, I feel like the entire house has room to breathe again.

The post Garage Pegboard Wall appeared first on The Ugly Duckling House.


Website // Subscribe // Advertise // Twitter // Facebook // Google+

Tuesday, June 23, 2015

Cheap and Easy DIY Lumber Rack

This is one of those projects where a harebrained idea turned out to actually work.

DIY lumber rack with shelf brackets

Part of my garage makeover plans included installing a wall-mounted lumber rack for full lengths of lumber, conduit pipe, and molding that haven’t yet been used. I’ve been searching for lumber rack ideas online and noticed that most of them came down to three options — each of which had their pros and cons.

1. DIY project: wood + pipe

The gist of this option is to install lengths of conduit pipe into a piece of lumber and then mount along studs.

Pros: this option looks pretty cool, super sturdy, and conduit pipe isn’t super expensive.

Cons: it seems like a little more work than I really want to do.

The conduit has to fit snugly and I can imagine myself procrastinating on getting this implemented due to the number of steps needed, which means months and months of lumber still laying around until it’s finished. So that’s out. Onto the next…

2. DIY project: furring strips + plywood

There are many variations, but the plywood plans are relatively the same: build supports and then install them between vertical lengths of wood along studs.

Pros: cost effective, visually ok, probably easier to DIY than the pipe version

Cons: I still see myself taking time on this one to cut and assemble.

Nothing really wrong with this project, but my lack of a table saw means that this may take too long, I’ll blow it off for several more months, and the lumber yet again continues to lay on my floor in the meantime. I’ll earmark this for “maybe later”, but what about an install-and-go option?

3. Buy

portamate-lumberrack

This pre-made version is less than $100, so if the goal is to just get it done and move onto the next project, it’s really not a bad choice. But after looking at specs of the depth and weight limits of each level, I realized that there may even be a cheaper and easier option altogether.

4. My lumber rack: shelf brackets!

DIY lumber rack shelf brackets

The storebought lumber rack has levels that each support 110 lbs and carry a depth of 12.25 inches. I figured that if I could find something similar in terms of steel shelf brackets, I may be able to make this project both cost effective and easy to install in less than an hour. So, I asked my dad to raid his garage, where he found six 12 x 14-inch shelf brackets. I brought a few outside for painting.

Most of these were old and covered in dirt and crusty paint, but FREE, and therefore my favorite kind of material to work with. I looked up their weight capacity online and discovered that when mounted into studs, each shelf can hold 100lbs — only 10 lbs shy of the storebought rack. (FYI: there are also heavy-duty shelf brackets that can support 300 lbs, but they cost quite a bit more, so the pre-made rack is actually cheaper and easier to install).

During the garage cleanup over this past weekend, I gave each bracket a few coats of primer and white spray paint, then installed them on one side of the garage (carefully making sure that each screw went into a stud). Then, I loaded ’em up:

DIY lumber rack

To my surprise, these two levels held every piece of full-length lumber, conduit pipe, and molding I had (I carefully distributed the heavier 2x4s between the racks, so I didn’t feel like I came anywhere close to the weight limit). I still need to build a lumber cart for scraps, but this solution was perfect for getting some of the biggest culprits of my bruised legs out of the way for good!

DIY lumber rack with shelf brackets

For the record, I’m not sure that this is really my long-term solution, so I’ll probably upgrade to the plywood version above (option #2) after I am no longer storing stuff along that wall for the upstairs bathroom. But for now, it suits my needs perfectly, and was both FREE and QUICK to install. No procrastinating, no DIY hiccups, no fuss. It also crosses part of the workshop makeover off of my project list!

  • pegboard organization wall
  • DIY lumber rack
  • charging station
  • lumber cart
  • gardening tool storage

Have you been thinking of building a lumber rack? Which version are you planning to install?

The post Cheap and Easy DIY Lumber Rack appeared first on The Ugly Duckling House.


Website // Subscribe // Advertise // Twitter // Facebook // Google+

The UDH Workshop: Let’s Get Started

First of all: I know that “let’s do this” is the slogan for big Orange (and therefore frequently seen across DIY blogland), but I often find myself wanting to just say it about a project I’m really excited about, even when it’s not the least bit sponsored. And the fact that I both majored in marketing and tend to hold a white-knuckle grip onto my favorite phrases kind of makes me chuckle every time I think about how HD has cleverly appropriated it for themselves. But it’s nothing that a taxidermied goat and colorful language can’t cure, right?

lets do this shit

Now that I’ve filled my rambling rant quota for the day, let’s do this move onto the whole point of this post: for this FIRST TIME in the history of working on this house, my one-car garage is now a much more organized space and on its way to becoming a bona fide workspace for all of my DIY projects.

Before I show you this genuinely horrifying “before” pic, let me warn you: I have a one-car garage. A 9-feet-11-inches-wide garage. And I’ve been DIYing home reno projects for over 5 years. I’m sure that’s the setup to some kind of algebraic word problem, but basically, it adds up to lots and lots of shit piling up in a very small space. Oh, and the train is leaving my house at 50 miles per hour.

I wish I’d started turning this space into a workshop a long time ago, but I just never seemed to find the motivation. But after working on my laundry room shelves and back yard garden beds, I kept getting frustrated that I didn’t have a flat, organized space for doing all of my cutting and assembly without bumping into a pile of lumber (or a box of crap, or a paint can, etc.).

I’d finally had enough, and in a desperate text to my mom, asked for her help. As a  quality control expert, she really knows how to organize a work space — of which I was immediately reminded by her response:

IMG_0451

Anyway, Mom surprisingly agreed to help (I mean, if you knew this was waiting for you, would you?) and even brought donuts (my mom is better than your mom). After running through a pot of coffee and talking up a game plan, we started making piles:

  • Goodwill for household items I don’t want anymore (which we loaded directly into Mom’s car)
  • Habitat Restore for used building materials I don’t need anymore (which we loaded directly into my car)
  • A separate pile for intact/still packaged building materials that I no longer need but can return to the home improvement store (for spending on things I really do need)
  • Trash

I also distributed other items back into the house where they belonged, hung up lots of previously missing tools, moved lumber into more organized groupings, and organized several new things I haven’t yet shared. By about 2pm, Mom was on her way home and I had the beginnings of a functional workshop — and more importantly, a plan of what needed to go where:

Hello, garage floor! Haven’t seen you in a long, long time!

At first, my intention was to stop here (I was exhausted, of course) and continue organizing another day. Some things, like the master bath’s vanity and toilet, couldn’t really be dealt with just yet, so I can’t really call this space done by any means. But once I rested for a bit, I kept wanting to get back in the garage and tackle a little more. I set my sights on the back corner near the hot water heater:

One hour (and a busted toe) later, I had shelves I could reach, a space for storing my bike, and lots of old paint to get rid of.

garage organization

Speaking of old paint: you can throw away latex paints once they’re completely dry (unlike oil paints, they aren’t considered hazardous waste). Since most of the cans I wanted to get rid of had just a little bit left in each can, the easiest way was to simply take the lids off for a couple of days. You can buy paint hardener as well, which will solidify a gallon of paint in just a couple of hours, but I’m perfectly happy to use the free version (just waiting it out). There are a few other options, so I’ll include those in a different post at some point.

There is still a little more that I’ll need to work on before everything is really finished, including five new workshop projects that I’m going to share soon!

  • a pegboard wall (done!)
  • lumber rack (done!)
  • gardening tool organization
  • lumber cart
  • drill charging station

But all in all, a huge amount was accomplished in a very short period of time. I’ve already sketched out the makings of my lumber cart as well, so this space should be changing quite a bit this summer. But how about you? Did you get anything organized over the weekend?

The post The UDH Workshop: Let’s Get Started appeared first on The Ugly Duckling House.


Website // Subscribe // Advertise // Twitter // Facebook // Google+