I feel like the more effort I put into a holiday, the more fun and personal it becomes. And this year, I seem to be much more determined to make a creative effort for the holidays.
For starters, I’m very excited about my tree skirt this year. For less than $10, and absolutely zero sewing required, my new Christmas tree looks cozy and soft.This little project is truly a lazy girl’s dream come true at the intersection of cheap and easy.
Like your mom. (Come on, you knew that cheesy joke was coming.)
I found the fabric at a discount store in Stone Mountain, GA called Fabric World. It’s basically a giant warehouse full of remnants, ribbon, and designer bolts piled on top of each other and sold at a fraction of their original cost. I’d never been before, but after striking out at the local craft store near my house, I was hoping I’d find a way to save a few pennies and buy some faux fur instead of buying the real deal sheepskins at Ikea for $29 a pop (I have one that I use in my office, and I love how soft it is, but I needed at least two more for wrapping around the base of my tree).
I wasn’t in the store but two minutes before I found not one, but two tables full of samples. Jackpot!
Some of the samples were several yards long, but most were just partial pieces (and the sign indicated that it was a buy-the-whole-piece situation, so there were no cuts allowed). It took a while to dig through, but the whole table was labeled $8.99 per yard, so it was well worth it to spend some time and select the softest, cream-colored, and most realistic-looking faux sheepskin fabric I could find. My jeans were pretty much covered in bits of faux fur by the end!
I spent an obsessive amount of time comparing and petting each piece. None of the remnants I found matched, and there was really only one that I thought was spot-on as far as a good fake, but it wasn’t going to be enough by itself. Since I knew I could layer the less realistic ones to wrap around the back of my tree, I took home my favorite and another two remnants that were less than half a yard each.
Here’s how the back of the tree looked with the two less-realistic pieces layered:
And here’s how the front looked with the large faux piece and the real one on top:
By now, you’ve probably noticed that I’m calling this a “no-sew sheepskin skirt” when I didn’t really make anything here; it’s just piles of fabric. There was no cutting or templating involved, but that’s kind of the awesome part about using fur (or even a faux fur blanket) instead of a sewn piece. Since I folded any of the visible corners underneath that would point to an obvious fake, and sheepskins would naturally be an asymmetrical shape, no one’s the wiser (except all of you internet folks who now know this is complete BS). And since I didn’t cut the original pieces, I can reuse them later to make pillows, a new faux rug, etc.
Out of curiosity, I checked out the price tag for a similar tree skirt at my closest Homegoods while I was out shopping for ornaments and gifts. Their version: $49.99.
My version: less than $10!
What do you think of my new “tree skirt”? I’m still in the midst of getting the tree fully decorated and the mantel finished, so check back in soon (or subscribe, I suppose) for those updates!
The scrap wood pile: if there were ever a universal symbol of a DIYer’s unwavering optimism and belief that trash can be useful, this is it.
We all have them, and we all know why we keep a random pile of wood around. It’s because we’re certain—with 0% chance of admitting we might be wrong—that someday, there will be a project that requires the use of one or two more pieces of wood. And without this lovely pile of things long-discarded, we would be completely screwed.
No, wait. We could just go to the store and buy another piece of wood.
All delusions aside, like most DIY fanatics, I too have a collection of scrap wood in my garage. And, seeing as how we all seem to not ever get around to making something out of this mess, Sandra from Sawdust Girl issued a challenge: just this once, why don’t we all actually get around to making something out of that scrap wood for a change? So, I did.
First off, this stupid trash can idea: do not do this. A trash can full of unfinished wood is Splinter City. It’s a dumb way to corral the wood because it wedges everything in place and I can’t see what pieces I have. Soon, when the master bathroom is done and the new vanity and toilet are no longer being stored in the garage, I’ll have the room I need to build a mobile lumber cart with a designated area for scrap pieces.
Moving on [she says, still giving the evil eye to the splinter bucket]… this sCrap wood challenge is pretty simple: use what you got; create something awesome. No new wood could be purchased, but reclaimed wood, branches, etc. are all fair game. And even though I originally intended on using my leftover walnut from my butcher block counters to create a bar along the wall in the kitchen, that project still needs a little longer to come together for the long-haul. So, I figured I’d try my hand on a project I’ve been wanting to tackle for a while.
DIY Wall-Mounted Magnetic Bottle Opener
Prior to attempting this project, I researched several DIY magnetic bottle opener tutorials (like this one… and this) online. I also noticed that almost all of them have the same general shape of a long rectangle around 8-10 inches long. Nothing is inherently wrong about this design, but I wanted to try something different and have it better match my kitchen’s style. So, I set out for one circular opener and one triangle shape to see if they could still do the job and look a little more “me” in the process. I haven’t seen any bottle openers that come in a different shape like these, so I had to try it!
Materials List
your choice of scrap wood (pieces I had: poplar and pine)
Forstner bits (matched to the respective width of your magnets used)
magnets (I did most of this project with ceramic magnets, but I plant to switch these out to rare earth magnets to make it stronger)
I started with the circle version, which wound up being the harder of the two. To create the shape, I just traced around a bowl and cut it out. Also, I seem to have zero talent for creating circles with a jigsaw.
I had a few uneven spots where the blade got away from me (yes, the same jigsaw where this happened, so I probably should have known better), so I had to spend a while with wood putty and sand it into a rounder shape.
(Speaking of sanding… has anyone ever done this?
I know I have sandpaper this size. I also know I have a sanding head that matches the sandpaper’s size in the above pic. But for some reason, none of these things could be found, and I got tired of looking for them. Is that creative or just lazy? Either way, it worked.)
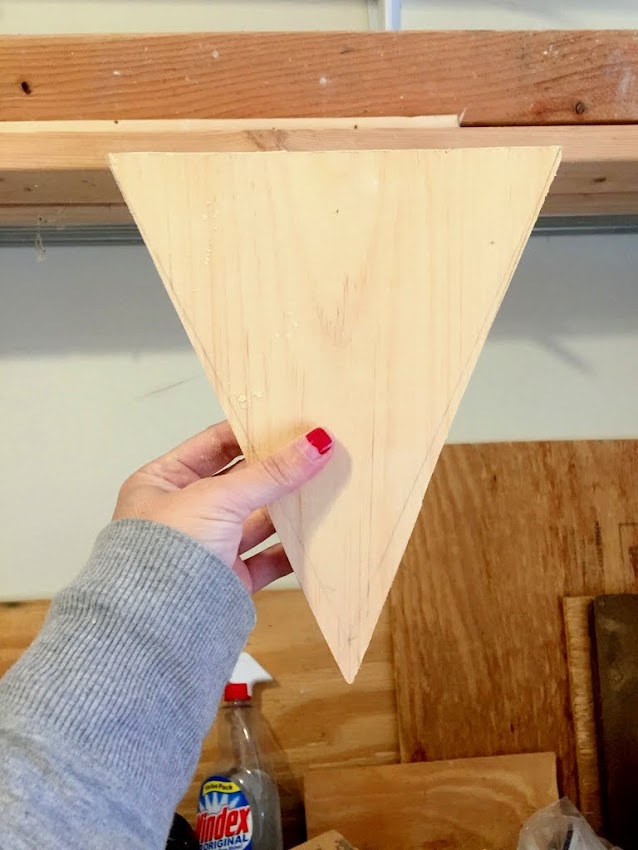
The triangle version was much easier. Starting with a square edge of a piece of 1×8 pine, I measured about 9 inches down from the top and marked the board halfway. I then used a straight edge from each corner to the middle point t create my triangle.
Since my miter saw doesn’t slide, it wasn’t perfect, but I filled along the sides of both pieces with wood putty and then used 60-grit sandpaper to shape. I then gradually continued shaping and smoothing out the wood on the top and sides with 120 and 240 grits as well as sanding the corners to take on a more rounded edge.
Next: staining. For the pine triangular piece, I chose not to stain it. For the circle, I used two different stain colors: in Burnished Walnut, and when that proved to be too light, I used two light coats of ZAR in Modern Walnut.
I’m not very patient when it comes to paint drying, so I pressed on as soon as possible and drilled the holes for the magnets. Since I used two different-sized magnets for this project (I was thinking that a larger one for each would be better for magnetizing), I therefore used two different bits. At first, I thought I would use spade bits (many tutorials I read had done this), which most homeowners have whenever they buy a large set of bits, but I soon realized that because the pieces of wood I was using were so shallow, a spade bit would poke through to the front of the wood (because the shape of spade bits have a long centering point).
To avoid this problem, I upgraded my bit collection to a set of Forstner bits, which bore flat-bottomed holes without the use of a long point.
Once all the holes were drilled, I used a strong glue to hold each magnet in place.
Since magnets can be stuck together to have an even greater pull force, I doubled up each one. I had a bunch of ceramic magnets already at home left over for use in a different project, so I wound up using these. These wound up working okay to hold the piece onto the fridge and catching bottle caps, but if I were to do the project over again (or if I wind up replacing them), I would instead use rare-earth magnets because they are much stronger.
The edges were painted a high gloss white with a small paint brush, and the tops were sprayed with a non-yellowing gloss spray sealer. After drying, it was a simple matter of attaching the bottle openers to the front and testing them out (quality control tip: always test the result anywhere from two to three beers, just to make sure it works… no judgment here).
All in all, I used 2 large magnets per piece and about 10 of the smaller ones, all clustered together along the back. The magnets are strong enough for the bottle opener to attach itself to the fridge, but you can also drill another hole with the Forstner bit at the top to give it a place for a screw to hook onto.
There you have it! This would also make for a great holiday gift, especially since it can be personalized (add lettering, change the color around the edge to match your decor, add a stencil or pattern to the magnetized area, etc). As for my own preference, I like the triangle one better for myself, so I’m likely going to give the round one away to a friend (though I’ll probably upgrade the magnets before I do that).
Also, in testing out both of these, I noticed that the brushed stainless steel bottle opener that I used on the round version works a lot better than the polished one on the triangle, which was disappointing since I like the look of it better and the screws were better quality (the brushed stainless ones stripped really easily). I found a gold/brass one I also liked through Rockler, but haven’t yet purchased it.
Do you have any scrap wood around the house? What are you planning to do with it? If you feel like taking on the challenge, you have a few more days to link up to those participating. Check out the other clever entries below!