Monday, December 7, 2015

Decking The Halls: My Christmas Kitchen Window!

FacebookTwitterPinterestTumblrEmail

Sheesh, this month is going to go by so fast! I’m actually very excited to be sharing this post with you today. I finally have my kitchen window finished, and it’s all decked out for the holidays!

christmas kitchen window

christmas kitchen window details

This year, I teamed up with 17 other bloggers to share some holiday vignette ideas as part of the Deck the Halls DIY-Style Tour, hosted by Jen from The House of Wood. There are lots of great mantel projects going on that you should check out, but since my living room mantel is about 80% television these days, I thought I’d do something a little different and look to another spot in the house that I’ve always wanted to decorate for Christmas.

deck-the-halls-diy-graphic

This faux Roman shade has been a long time coming, and now that it’s done, I realize that unlike most projects, I was putting this one off for good reason. To be honest, I kind of struggled putting it together! But now that I have a chance to rest my back, I can happily say it was worth it, though hopefully some of this info will help save you some time if you attempt the same project. ;)

christmas kitchen window side view

First, I started by looking at a couple of tutorials on how to make an actual Roman shade, but my lazier side won when I saw that some had just tacked the window fabric together to look like a proper shade instead of making it functional. Since I don’t plan on using the shade itself, that seemed easier, but I underestimated my lack of patience with learning how to pin folds just so. Honestly, I think it would have gone much easier if I hadn’t been working with this particular fabric, but I went with it because it was inexpensive and I had been on kind of a long search to find it. Surprisingly, black and white stripes of this width were hard to find; I had been casually looking whenever I went to a store that had fabric, but kept coming up empty-handed. I finally found some $7.99 per yard and wound up using just one yard to put it together.

ikea black white stripe fabric

The main challenge was that the fabric was heavyweight upholstery, so I wasn’t used to working with it much. The wrinkles were hard to get out, and I found myself struggling to find the right balance between ironing it thoroughly and avoiding the consequences of pressing too long…

too hot iron scorch mark

I swear, someday I’ll have this adulting thing figured out.

Anyway, I used some Heat n’ Bond to make the curtain no-sew. Starting with the edge that was pre-cut (so I was working from a straight line), I simply measured 3/4″ extra on the sides and bottom so that it was wider than my window (because the Heat n’ Bond was 3/4″ wide, so I’d need that much extra when folding over the sides).

how to use heat n bond

It’s actually pretty easy to use; you just fold the fabric over and press with a hot iron to get your crease, then tuck the Heat n’ Bond into the fold and press again. The strip melts the two sides together, and boom: you’ve got your clean edge. I could have folded it over a second time to get a more perfect-looking hem on the back, but I didn’t for three reasons:

  1. that would have made the edge a lot thicker than I wanted
  2. it seemed like overkill for a curtain facing my back yard (I mean, no one’s going to see the back much!)
  3. and most importantly: I wasn’t in the mood to re-cut and add another 3/4″ all the way around

how to use heat n bond

Once I had the fabric done on the three sides that would be exposed, I wrapped the top around a scrap piece of 1×2 furring strip that I had in my garage, and then went about trying to get it attached inside of the window frame. Since this proved to be kind of difficult keeping it perfectly straight while trying to simultaneously drill the ends into the frame with the other hand, I worked out a small solution to be my extra hands.

use nails to help when you need extra hands

By tacking up a couple of extra nails on the sides of the window, I could rest the wood in place (resting on top of the nails) and concentrate on drilling several 2″-long screws vertically through the furring strip and into the window frame (I recommend pre-drilling as well to keep the furring strip from splitting, but with inexpensive scrap wood like this, there’s a chance that will happen anyway).

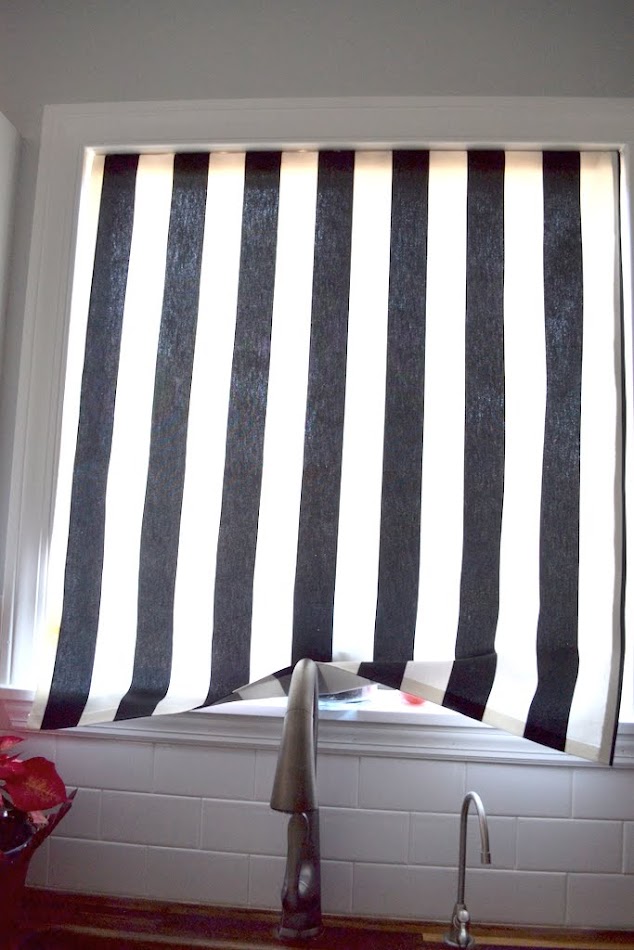
Once attached, I began the process of gathering the fabric and pinning in various places to create my loops and folds to create the Roman shade look (the pins are visible up close, but you can’t really see them if you aren’t looking for it). This part took longer than I thought, and I realized that I might have had better luck creating the folds first and then hanging it, but I originally decided against it because I worried that the pins would come loose as I wrestled with getting it into place (plus, working with stripes can make it really obvious if something’s not hanging just right, and I didn’t want to have to take it down a second time if it was wrong). I suppose either method can work, so just do what makes sense to you. My decision was kind of also made for me since I couldn’t find my pins until after hanging it up; because of course that’s how losing things work!

christmas kitchen window curtain

After the shade was up, the rest of the window came together quickly. I had most of the stuff on hand already (source list below), and sprinkled in one or two new items, like the petite berry wreath (which I hung with a clear command hook for easy removal later) and the shiny red reindeer on the right. My kitchen unfortunately doesn’t get a lot of light from the rest of the room (the windows are pretty much all on one side), so I really wish the photos had turned out a little better. (Maybe Santa will bring me a lighting kit for Christmas?)

poinsettias black friday kitchen

christmas kitchen window snowflake ornament

Whenever I need something a little extra for filling in blank spaces, I like to use items from the dollar store. Originally, the glittery pine cones and such were part of a fake poinsettia stem, which I took apart for other decor in the house.

dollar store poinsettia stem

Usually, it’s pretty easy to disassemble; just find the base of the piece that you want and yank. If something is hot glued onto a stem, wire cutters will do the trick.

There you have it! I am really happy with the result, and the striped shade will be around permanently… or until I decide to try another round and improve on the look. Since this was my first time creating it, there are things I would do better if I did it over again, but I’m satisfied enough for now to just move on. There’s lots more decorating to do yet!

christmas kitchen window closeup

Source list:
  • Small wreath: T.J.Maxx
  • Window fabric: Ikea
  • Small trees: Walmart
  • Red reindeer: T.J.Maxx
  • Lacy glitter tree: I forget, I’ve had it for a long while
  • Large red ball ornaments: Target
  • Snowflake and star ornaments: Target
  • Pinecones, small bits, small silver ornaments: Dollar Tree
  • Poinsettias: Home Depot (Black Friday 99-cent deal!)

FacebookTwitterPinterestTumblrEmail

The post Decking The Halls: My Christmas Kitchen Window! appeared first on The Ugly Duckling House.

Website // Subscribe // Advertise // Twitter // Facebook // Google+

Saturday, December 5, 2015

It’s Pronounced “Damn Good Cookie” — Granny’s Favorite Kolache Recipe

FacebookTwitterPinterestTumblrEmail

No, you are not drunk. You read the title right. Today, for the first time in the history of this blog, my Cleaning and Recipes link will cease to be quite as much of a prank as it has always been (and if you’ve been reading this blog through a reader, it’s the one prank that has always existed here, and you should probably check it out by clicking through to the blog’s navigation bar to get clued into the joke!).* Today, I’m sharing a family cookie favorite: Granny’s kolache recipe.

Granny's kolache cookie recipe

Kolache, kolach, kolacky, or even just “damn good cookies” as she sometimes called them—this recipe has been synonymous with my family’s holiday memories. And today, I decided I just wanted to share it. Not just because they’re awesome—I mean, any cookie that’s oddly tangy and covered in powdered sugar can’t not be—but because of what it means to my family and the memory of Gran.

Granny cooking in the kitchen

I took most of these cookie pictures last Christmas while baking with Mom, but since Granny’s passing earlier this year, she’s been on my mind a lot lately. This will be the first holiday season without her, and even though her Alzheimer’s meant she stopped being able to bake with us a long time ago, the pain from missing her is still very present.

old handwritten recipe cards
Original handwritten recipes.

Even though it’s not in my usual blog nature to share recipes at all (since I’m admittedly a terrible cook, but a decent baker), sharing this recipe with you is my way of remembering my Granny in a way that she could appreciate while using as little swear words as possible (another trait I inherited from her). Plus, it’s Friday, which is often the day I choose to share life-related posts, so it seems fitting. One thing to note is that I’m actually putting up the recipe in its entirety (with family permission), because one of Granny’s other traditions was to remove one ingredient before sharing it outside of the family… just so that no one else’s food would taste as good as hers (and she’d probably say “Ah, hell!” if she knew I was doing this!). That, plus I kinda promised that I’d share these already, so now seems like as good of a time as any to catch up on the 982 other drafts in my writing folder.

family traditions

Growing up, there were certain events that were simply understood as tradition in our family. We’d watch White Christmas together. We’d put up Uncle Knick-Knack and fight over white or multi-color lights. We’d make the dog miserable by dressing her in a Santa hat, putting those sticky bows on her back, or some other such equally traumatizing display of affection. And, of course, we’d make all the family recipes. My personal favorite is, and has always been, hard-boiled egg cookies, but I’ll save that recipe for another week. These Czech cookies are handed down from my Mom’s side, and I distinctly remember helping my grandmother roll out dough on her old macaroni board, sneaking finger licks of powdered sugar as I “helped” her put jam into all of the cookies (but usually just got sticky—and I hated being sticky!). She’d sometimes make them into “thumbprint” versions with the same dough, and I always felt special that she would not only make these specifically because I asked her to, but she’d let me be the one to press my little thumb into each one.

Granny - walnuts and cookies
Granny crushing walnuts for another cookie recipe.

Now that most of the cookie making goes on in Mom’s house, we have used Mom’s rules for cookie baking—one of which being that we fold these cookies like tiny cannolis. They taste the same and look a lot better than my mashed thumb versions, but ultimately playing around with our traditions was also just as much of a part of the holiday. Cue terrible hair choices and cheesy smile in 3… 2… 1…

Moms kitchen baking cookies 2007

(I know, I put way too many dumb photos of myself on this blog. But if I can’t laugh at myself, then everyone else is still laughing at me, and Mom will share this photo 4 times over.)

Anywho… onto the recipe and some pretty cookie pics!

kolache cookie recipe

Granny’s Favorite Jam Kolache Recipe

Cookie dough:

  • 1/2 lb butter
  • 1 cup shortening
  • 1 Tbsp. Salt
  • 1 Tbsp. Baking Powder
  • 4 eggs
  • 1/2 pint of sour cream
  • 1 pkg yeast
  • 1/2 cup warm water
  • 7-1/2 cups flour
  • an ungodly amount of powdered sugar

Filling:

  • Prune whip or lekvar (usually a prune or apricot butter)
  • Apricot, peach, strawberry preserves (your choice)

Directions:
1. Dissolve yeast in a 1/2 cup warm water.
2. Mix dry ingredients in a large bowl. Add butter and shortening and cut in like pie crust.
3. Beat 4 eggs in another bowl and add sour cream, mix well.
4. Add dissolved yeast and water mixture.
5. Chill dough several hours or overnight.
6. Roll dough out in powder sugar. Cut the dough into 3×3 inch squares. Place a tsp. of filling in the center of each square. Overlap opposite corners and pinch together.
7. Place on cookie sheet lined with parchment paper and bake 17 minutes at 350 degrees until nicely brown. Remove from oven and dust tops with powdered sugar.

The powdered sugar gives this cookie the right sweetness as the dough has no sugar in it. Make sure you roll the dough out in powdered sugar, not flour, because it will taste way too sour with just the jam and the sprinkle on top. Also, this dough warms quickly and can get soft, so you may have to re-chill periodically to make it roll between batches. Watch the oven carefully if you have a finicky uneven one like Mom’s, because these taste best just as they start to turn brown (the thinness of the dough can make them crispy fast, and I prefer them a little softer).

Once baked, fan out on a pretty plate or paper doily, dust with powdered sugar, and watch them disappear. Experiment with fillings until you find one you can’t stop eating. Granny’s favorite was often lekvar or a sugary-walnut mixture left over from another batch of holiday cookies we’d make (that I hated). I’m personally partial to the plum and apricot myself, but it’s fun to gather up all of the jams from the fridge and see what tastes good.

Granny's kolache cookie recipe

We’re planning on doing another cookie bake this year (next week), so I’ll probably update this post with more pics once those are baked and ready for eating. And, of course, I’ll also be sharing the recipe of my favorite cookies ever: hard-boiled egg (I know, it sounds weird, but you gotta trust me and try them at least once). Enjoy!

*For the record, the prank will remain on this blog. I’m just going to add this recipe to a new category in the Project Gallery (no sense ruining one of my favorite running jokes for a couple of recipes!).

FacebookTwitterPinterestTumblrEmail

The post It’s Pronounced “Damn Good Cookie” — Granny’s Favorite Kolache Recipe appeared first on The Ugly Duckling House.

Website // Subscribe // Advertise // Twitter // Facebook // Google+

Friday, December 4, 2015

Red and White and Close to Finished

FacebookTwitterPinterestTumblrEmail

It’s that time of year again where I push myself to get a bunch of things done, spin out of energy, get a cold that won’t go away, and the days disappear. Otherwise known as winter.

Oh, and the asshole squirrel is back and trying to get in the house again as of this morning, so there will be more updates on that little mofo soon.

In brighter and happier news though, I am making progress on my red and white Christmas tree in the living room. I have settled on a white/silver/gold/red color scheme, and while it’s not quite finished exactly where I want everything (because I can’t seem to stop futzing with it), I expect to put the ornaments down and call it done sometime this weekend.

red tree ornament

I haven’t really done color themes for the tree in the past, and that’s because I have far too many weird and wacky ornaments from my Old World Christmas collection to really fit with a theme of any kind. Now that I’ve decided to part with that tradition for something different this year, I had to go out and purchase a few new ornaments that would tie together. Except I’m used to just throwing ornaments on the tree in a drunken fashion, so I don’t really have this whole balanced-and-magazine-worthy tree decorating thing figured out. Which is also making a huuuuuge mess, but the creative experimenting been fun.

Small tip: I was messing with this tree for a while until I decided that I would try the lets-have-wine-and-see-what-happens approach. Decorating while intoxicated works, right? Only I talked myself out of it since I’d read somewhere that says you shouldn’t drink alcohol when you’ve been taking cold meds, so I instead gave my tree the side-eye until I realized that my mistake was making the tree not personal enough. In my efforts to make the tree perfect, I had forgotten about all of the sentimental fun. So, I have been slowly incorporating my personal collection back into the display little by little (to my surprise, there were far more ornaments I already had that fit the color scheme), and it seems to be working out much better than expected.

As for the rest of my OWC collection, it and the other family ornaments are still going to go on a tree, just not the one in the living room. I resurrected my old tree from last year and put it in the newly painted kitchen. As you can see, half of it is burnt out (as a pre-lit tree, I knew this day would eventually come), but I’ve been trying to save it with some help from a nifty light-checking tool that a manufacturer sent me to see if it would help.* It seems to be working so far, but I think some of the strings are simply beyond saving, so I’ll have to put some new lights in those areas (I am too lazy to remove the old lights wrapped around the branches, but I will still put new lights on).

I’m also working on a few projects outside to make the front entryway more festive, but more to come on that soon. The ruby red snapdragons and lacy-soft dusty miller I planted around the mailbox earlier in the fall have been beautifully maintenance free, and they look color-perfect for the holiday season. One of the few things I have ever planted that turned out exactly the way I wanted!

I’m working on a crafty project for the mantel and dining room table, but I’ve yet to see one of the pieces turn out successfully, so I’ll keep ya posted on it when it’s either up and glittery and a Christmas miracle or embedded into the drywall. Technically, I consider it decoration either way.

*FYI, this post is not sponsored.

FacebookTwitterPinterestTumblrEmail

The post Red and White and Close to Finished appeared first on The Ugly Duckling House.

Website // Subscribe // Advertise // Twitter // Facebook // Google+