Wednesday, September 23, 2015

Mystery Mums

As I’ve mentioned in recent posts, I’ve been spending this gorgeous weather we’ve had lately outside. And while that would normally be lovely regardless of the activity, gardening is definitely not one of my favorites. I know there are plenty of people who enjoy it, but I wonder: do they all just live in a different part of the country? Mosquitoes around here make gardening pretty effing terrible.

Anyway, onto the update. As a blogger, the whole “after” thing takes a lot more work when it’s an exterior project, mainly due to how many other things there are in the shot that might ruin the whole look. I had all of the exterior siding repaired less than two months ago, so I told myself that I wanted to get the rest of the yard looking more finished so I could have some decent pics of the house for a change (after five years of being embarrassed by it, I think we’re just going to chalk this up to stubbornness). So, next up on the to-do list: the front garden.

mystery mums

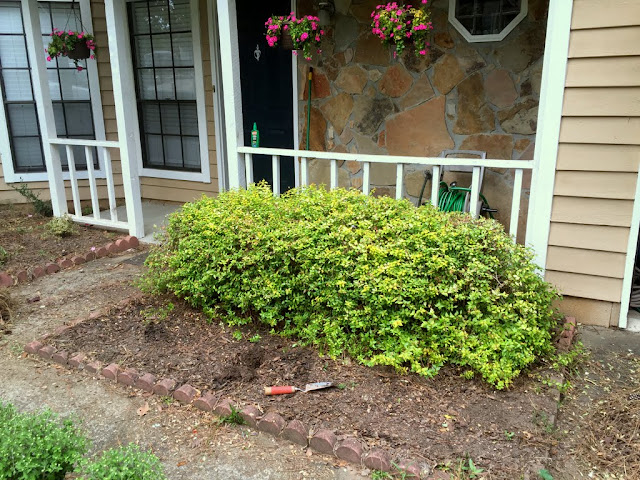
My front garden gets planted about once or twice a year, and then is left alone for the rest (mostly because I have too many other projects going on to care). Still, considering that it’s directly in front of the house and all of the new work on the siding I just had done, leaving this alone would leave my “after” pictures looking pretty shabby, even with the new hanging baskets:

I started out by cleaning up the scraggly shrubs. I’d already done a lot of the trimming before this point, but pine straw tends to get really tangled underneath and between the lower branches. I found this little shrub rake that seems to work pretty well at getting at the pine straw without pulling at the branches above.

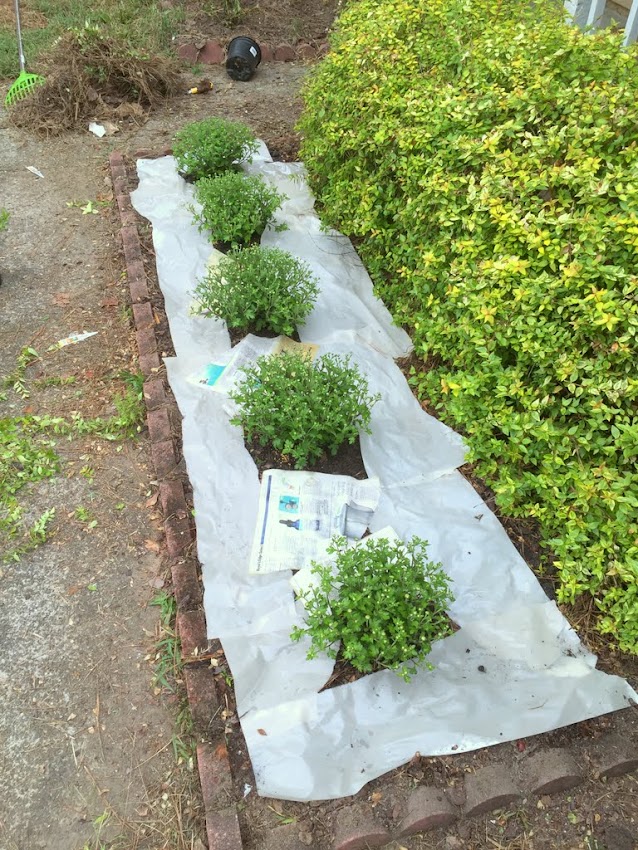
I then began digging each hole for the new plants. As you can probably guess from the post title, I went with some fall mums. They’re perennials, so there’s always the chance that they might stick around next year, but you never know what this garden’s going to look like (and you longtime readers may remember the mangled one that never came back after it was destroyed going in!).

To help protect the area a little bit more from weeds, I used some watered-down newspaper before spreading around some dark brown mulch.

And there you have it: mums!

It really makes the rest of the front area look so much better. (Ignore the light blue paint on the ceiling that isn’t finished, though… it’s mid-project.)

There’s only one little thing, though… I have no idea what color these are going to be. There were no labels in the store, the clerk didn’t have a clue, and when the buds are this small, they all tend to look the same color (though I think they’re probably light, such as white or yellow… the darker colors tend to have a slight hue in the middle of each bud).

The front area of the house has never looked quite this good. It’s really coming along, and I’m glad that all of this yard work is hopefully paying off for a very colorful fall. What color do you think the mums will be?

The post Mystery Mums appeared first on The Ugly Duckling House.

Website // Subscribe // Advertise // Twitter // Facebook // Google+

Sunday, September 20, 2015

How to Save a Bundle on Perennials and Hanging Plants

Outdoor landscaping is one of those things that I’m occasionally but not consistently successful at. Kind of like Kanye West hiding his joy.

But, every now and then, I manage to get it right—at least as far as cost is concerned. A recent trip to Lowe’s proved extremely fruitful for finding some amazing end-of-the-season sales on some hanging plants.

It’s easy to miss them if you’re not looking in the right spot. In my local store, you had to walk allllll the way past the outdoor display to the back corner.

Keep going…

saving money on plants

At their normal price, I would have spent more on just one of these plants than I did on all three for the front porch!

They did a great job of brightening up front entryway while I continued working on the rest of the yard.

Wait… did you catch that cameo?

hey Charlie
Nosy little buttmunch. Looks like I’ll be cleaning that window again.

Pink vinca aren’t really my favorite (I prefer the white version if given the option), but for the price, they add a lot of great color. And even though they’re technically the end of the season, there is still plenty of warm weather to keep these blooming for a bit… as long as I can remember to keep watering them!

I wish I could show everything in one big, finished photo for the side of the house as well, but I’m not quite there yet. You see, I wound up scoring BIG on perennials, too! Almost ALL of the plants you see in the below photo (except for the red snapdragons, which I covered last week) were picked up for just $1 each. Lowe’s is now my favorite dollar store, ever.

I’ve spent the last two weekends of summer fighting off mosquitoes and trying to get these guys in the ground, but there is so much space to fill that it’s taking several weekends to properly weed, clean up, plant, fertilize and mulch these beauties. I can show you a few in-progress shots though. Remember this area by the garage on the right side of the house?

I’ve just never had much success with plantings over here. But at $1 per plant, this effort is well worth the gamble to see what survives the winter. For one thing, I’ve decided to dig up and straighten out the red scallop edging that has always looked really scraggly and made it hard to figure out where to mow (I also hate the color and shape of the edging, but it came with the house and would cost way too much to replace it everywhere, so I’m sticking with what’s free and available).

Cloudy days: not great for brown on brown photos, but a lot easier for sweating through.

This spot is now getting the attention it deserves, which is a LOT of work (have you ever dug up and then dug a new line for stone edging? Ugh. Thank God for my mattock, though). But five years is probably long enough for procrastinating.

I’ve also snagged a few leftover edgers to create another little space on the right side of the fence as well. Hopefully the phlox will get plenty of sun in this spot and grow nice and full.

I will say, going ahead and completing the first section of plants, laying down newspaper for weeding, and mulch in front of the holly shrub makes things look instantly better!

The sage itself is looking pretty bleak (the flowers all promptly fell off the day I planted them in the ground), but I’m still hopeful that they will bounce back. And if they don’t, I’m out about the price of a Starbucks coffee, so I won’t be shedding any tears.

Sigh… still plenty more left to do. Maybe one more weekend?

The post How to Save a Bundle on Perennials and Hanging Plants appeared first on The Ugly Duckling House.

Website // Subscribe // Advertise // Twitter // Facebook // Google+

Wednesday, September 16, 2015

Snapdragons at the Mailbox

After getting home from Black Feather Farm, I seem to have a renewed desire for getting things done (so, I suppose, that means lots of pics and posts coming soon). The first thing I did was seasonal and easy: adding fresh flowers to the mailbox.

snapdragons

I’ve tried out yellow snapdragons before (and they’ve thrived in this spot), but these red ones really caught my eye while perusing Lowe’s selection last week. I went a little crazy on their clearance section of perennials as well (more on that in a separate post), but I simply loved these and figured that with all of the money I was saving on the other plants, paying full price for these beauties was well worth it.

Pardon the grass… that’s not something I’m willing to do more than (occasionally) mow at this point. But, you might also be able to spot a few more upgrades to the exterior in the below pic in the form of finished and painted siding and trim!

I guess part of the reason I’m so anxious to get some of the greenery updated around the house is to showcase all of the finished siding repair. It’s looking better than it ever has before, and I really want to get some good photos in before it gets too cold and all of the flowers die off. In fact, if it weren’t for the obnoxious squirrel I have to deal with in my attic this week (UGH), I’d probably already have some more updates on that. There’s a lot of mulching and fussing and primping going on, so I hope the after photos are going to have some serious oomph!

In addition to the snapdragons, I also planted another one of my favorite annuals… Dusty Miller. Their frosty green leaves always seem to add a little sophistication, yet they’re cheap as hell budget-friendly for buying in large quantities and planting practically everywhere. They aren’t supposed to last all winter, but Georgia is still going to have several more warm months before these die out (and if the weather is mild, both they and the snapdragons will continue to bloom all winter with practically zero effort on my part to keep them alive).

More on all of the other plants and updates comin’ at ya shortly. Here’s a sneak peek!

The post Snapdragons at the Mailbox appeared first on The Ugly Duckling House.

Website // Subscribe // Advertise // Twitter // Facebook // Google+

Saturday, September 12, 2015

Tiling Kit’s Bathroom at Black Feather Farm

Ok, so as I mentioned in part 1 and part 2 of my recap on Black Feather Farm, Kit (DIYDiva.net) and I didn’t really have a set game plan for what we would be doing during my three-day visit. But as I was walking around the farmhouse for the first time, Kit and I were already chatting up a storm about all the projects we’ve each been doing and how long our to-do lists seem to keep getting. And that’s when I took a peek into her upstairs guest bath and saw a very familiar sight:

Back in March, Kit began tiling her bathroom. Then stopped. And this was how it stayed for many months.

I can’t even talk shit about this. That’s the way projects go sometimes—especially if you’re doing them on your own and have things like donkeys and chickens to feed and chase out of your kitchen. Not to mention, I’m not exactly the right person to judge another’s progress considering how long it takes me to finish my own bathrooms (ahem, the master still has zero progress made since ripping it out). Instead, I looked at this room and had only one thought: since I realistically have nothing else to do while I’m here, why not help Kit finish something that she isn’t able to get to, like this shower tile?

Kit had made a couple of comments earlier in the day that one of her favorite things to beat cold Michigan winters is a hot bath, and I noticed that she had all of the supplies already (such as big, giant boxes of tile just sitting around, itching to be put on a wall). She also mentioned how exhausted she was. It seemed like an easy win to just put on a comfy tee, open a bottle of beer, turn on my music playlist, and get to work.

tiling bathroom black feather farm

In hindsight, I really should have paid more attention to how tired Kit really was, but she hung in there with me during the entire first day (save for her occasional meetings and such while working from home). I then continued on with finishing one side the next afternoon while Kit was at work, and then she helped finish the last side the same night.

There was a lot of beer, and swearing, and goofing around, but here’s where we started:

There was also some ingenuity on Kit’s part:

ingenuity

We also Periscoped each night as we made progress, so check out my last post if you want to see two overtired gals talking incoherently about tiling and making weird jokes.

And here’s where we finished!

Wouldn’t you know it… we were ONE bullnose tile short! UGH.

You eagle-eyed DIYers might also notice that the tile in the corner on the left doesn’t quite match up. That’s because we used two different brands of 1/8″ spacers, and it turned out that despite that they were supposed to be the same size, they created the slightest difference in spacing, which eventually causes a misalignment in grout lines when you’re half a bottle of wine in at midnight not paying attention. We did a lot of mixing and matching of the spacers on the first two walls, but on the final wall (the one with the shower fixtures), we used just one type. We didn’t notice the misalignment until the first section had already begun curing, so this is how it’s going to look. The average person who might take a shower in here wouldn’t notice, so it’s really just one of those things that’s going to bother the person who did the installing. So, lesson learned: use the same kind of tile spacers consistently. Or don’t drink and tile. Or just pay more attention to your work. Or some combination of those things… I won’t judge.

BUT WE (NEARLY?) FINISHED IT, which means that Kit is one large step closer to having a nice, cozy bath upstairs this winter. I hope she enjoys it as much as I enjoyed working on it!

The post Tiling Kit’s Bathroom at Black Feather Farm appeared first on The Ugly Duckling House.

Website // Subscribe // Advertise // Twitter // Facebook // Google+